
Getting Started:
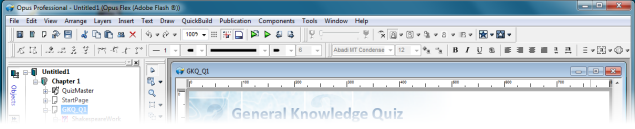
The Opus editor is divided into two basic sections with a menu bar and a set of toolbars at the top which provide access to the most common functions.
The Text formatting toolbar (familiar to anyone who uses a word processor) and the Vector editing toolbar (for editing objects drawn with the Opus drawing tools) will both appear when they are required but can be set to appear all the time using the Options settings.
The remainder of the editor is divided into two sections.
To the left is the Organiser.
This is a tabbed palette which is mainly used to provide an explorer type view of the objects in your publication so that you can select pages, chapters and individual objects them and move them up and down, rename them or transfer them easily between pages or chapters if required.
The Actions tab of the Organiser provides a similar view of any actions you have assigned to objects on the chosen page.
The Pages tab provides a thumbnail view of all your pages so that you can review them visually.
The Page Templates and Components tabs provide ready-made pages and other objects for you to use in your publication to make you even more productive from the outset.
In Pro versions there will also be a Script tab which provides a reference list of all the functions available in OpusScript. When writing scripts you can simply double-click on the function to insert it in your script at the current cursor position.
The area to the right is the Page View and is where you will spend most time laying out objects and repositioning them. You can zoom in and out of this view using the Zoom tool or the Zoom setting on the main toolbar.
A grid is provided for you to position objects but Opus also provides an extensive range of functions to align objects in many different ways, to make them the same size or even to space them evenly or stack them vertically or horizontally.
Between the Organiser and the Page View is a vertical toolbar providing all the tools to create objects including images, video, frames, and text.
Opus Pro and Opus Creator Reference - Workspace