
Opus Pro Tutorial:
IMPORTANT NOTE: The mysql connection scripts in this tutorial should now be replaced by mysqli versions. Until we update the tutorial please check the updated sysntax here.
When publishing to HTML5 Opus Pro lets you communicate with a database on your server using the Post Web Data actions in conjunction with PHP or ASP script files to send and retrieve data.
The following steps will show you how to set up a MySQL database on the web server, create a PHP file which will write records to this database and produce an Opus publication which will send this information to the PHP file.
This procedure assumes that PHP 4.x and MySQL are installed and correctly configured on your web server. To test this, simply create a file in Notepad containing the following script:
<?php phpinfo() ?>
and save this file in the document root of your webserver (this is the htdocs folder on an Apache web server or the wwwroot folder on an IIS web server) with the name test.php. Once saved, please open your browser and navigate to the address http://webserver/test.php (where webserver is the IP address or domain name of your web server or localhost if the web server is running on the local machine).
If PHP is correctly installed, an information page should appear listing version numbers and installed modules. To confirm whether your PHP installation supports connections to MySQL databases, simply scroll down this list and look for a table named mysql or mysqli. Please also ensure that the MySQL service is running on the web server (this is usually indicated by a green traffic light icon in the system tray or you can run the services.msc applet from the Run command to check if this service is installed and running).
All being well, please use a graphical front-end (such as MySQL Administrator or phpMyAdmin) or the command line to create a new MySQL database (sometimes called a schema) named mydb. In this database, create a new table named employees containing the following four fields:
In real-world situations, you would probably want to add an auto-incrementing primary key as the first field of this database so that each record has a unique numerical record, but this is not necessary for this example.
Now launch Notepad and insert the following script commands:
<?php

$new_first = $_POST['send_first'];
$new_last = $_POST['send_last'];
$new_address = $_POST'send_address'];
$new_position = $_POST['send_position'];

$DBhost = "localhost";
$DBuser = "username";
$DBpass = "password";
$DBName = "mydb";

$connection = mysqli_connect($DBhost, $DBuser, $DBpass, $DBName);

if (mysqli_connect_errno())
  {
   $conn_return= "&DB_Feedback=Connection error" . mysqli_connect_error();
  }
else
{
 $conn_return="&DB_Feedback=Connection Succeeded";
}
echo $conn_return;

$sql = "INSERT INTO employees (First_Name, Last_Name, Address, Position) VALUES ('$new_first', '$new_last','$new_address','$new_position')";

if ($conn->query($sql) === TRUE)
{
$conn_return="&DB_Feedback=User Added";
}
else
{
$conn_return= "&DB_Feedback=Error: " . $sql . $conn->error;
}
echo $conn_return;

$conn->close();

?>
Please replace localhost with the address of the database server (or leave it as localhost if the server is running on the local machine), replace username with a user who has access to the mydb database (for example, root) and replace password with the password for this user (by default, the root user's password is blank, but you may have altered this in the MySQL configuration).
Now save this document in the document root of your web server with the file name insert.php.
Now create a new publication in Opus and add four text input fields to the page. Set the first input field to store information into a new variable named current_first, the second to a variable named current_last, the third to a variable named current_address and the final field to store information into a variable named current_position (all of these variables should be set to an Opus publication variable with an initial blank text value).
Now add a button to the page and apply a Post Web Data action. As we want the Opus publication to be the source of the data, select the Source tab. In the URL field, input the address to the insert.php file on your web server (if the server is running on the local machine, this will probably be http://localhost/insert.php)
Select the Multiple Fields option, then click the Add button four times to create four parameters and rename the parameters to send_first, send_last, send_address and send_position respectively. Now open the drop-down menu to the right of each parameter and select the corresponding variable from the list. The screen should now resemble the following:
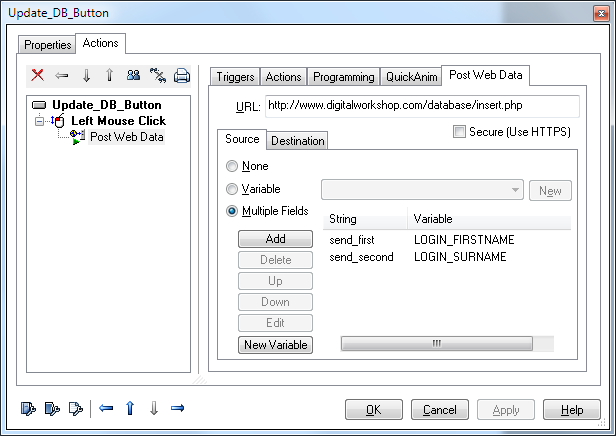
Click Apply and OK to confirm the changes.
Now preview the publication, input some information into each of the fields and click the button to post the data.
You can now check that the data has been added to the table by reviweing the data in the database itselg using phpMyAdmin or MySQL Query Browser. Alternatively if you are familiar with the mysql command prompt, then launch that and issuing the command:
SELECT * FROM employees;
You should be able to see the details you typed in saved into the relevant field in the database.
It is easy to get confused about which variable name to use in each position. Anything in the php script above which begins with a $ is a php variable and is not related to your Opus script or your database, except that the $POST variable is looking for the "string" you named your Opus variable with. The names of the fields/rows in your database are the names used in the first set of brackets in the INSERT INTO statement and again these are not the names used by the Opus Post Web Data.
The name used by Opus as the label (or "string") is the one to be used in the square brackets after the relevant $POST. The name of the variable used in Opus is never directly used in the php the "bridge" between Opus and the php is the "string" which is passed to the pho via the $POST command.
Checking for Problems
The script above includes several lines which check to see if there has been an error and store information about the state of the process in a php variable called &DB_Feedback which is sent back to the web page for Opus to look at by using the php function echo. To retrieve this information in Opus use the Destination tab of the PostWebData action to look for DB_Feedback and save it into an Opus variable, in this example we have used DB_Feedback_Message.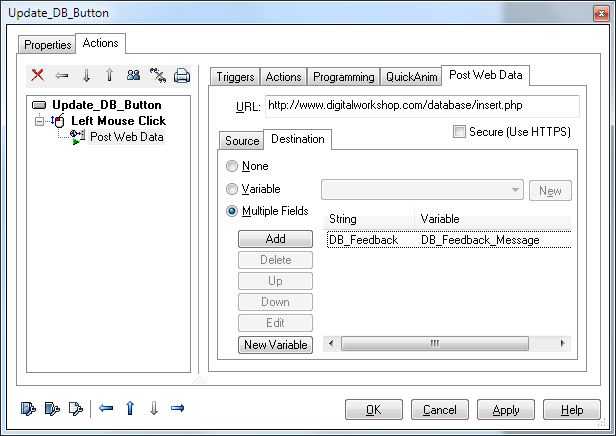
connecting to a web database