
OpusScript Tutorial:
Our Bouncing Ball publication is now essentially complete - we have a working model of gravity, our ball bounces off the walls of the publication and we can throw the ball around the publication at will. However, although our script actions are advanced, the publication still looks very basic. Let's see if we can add some pizzazz!
We'll start by adding a nice textured background to the page. Please right-click on Page 1 in the Organiser pane and select Properties, as shown below:

Now select the Background tab and enable the Use Background option. Use the arrow alongside the preview of the background colour to bring up the palette of Presets and scroll through until you find the Wood Rose preset gradient. Click on it to select and then use the angle arrow to set the angle of the gradient to around 320 degrees.

Please select the Texture tab and place a tick in the Texture checkbox. Select the Materials category of textures and then select the texture to Flat Bricks Med, with the Mode set to Tiled, Shininess set to Paper. The dialog box should now look like:

Click Apply and OK to return to confirm the changes.
Our Ball object is currently doing a great job of behaving like a ball, but it doesn't look very spherical. In fact, it looks just like a flat 2D circle. Let's modify the properties of the object to correct this.
In the Organiser pane, click on the small plus-sign to the left of the Ball object to display the Polygon. Now right-click on Polygon and select Properties as shown below:

Now select the Vector Pen tab and remove the tick from the Stroked option. The properties should now resemble the following:

Now select the Vector Fill tab. The Use Background option should already be enabled and the background colour should currently be set to solid red. Please open the Style drop-down menu and change the style to Circular Gradient. Now click on the  button to add a new colour triangle to the gradient bar. The properties should now look something like the following:

Now click on the colour triangle at the far-left of the gradient bar to select it:

Once selected, click on the  button. A menu should appear below the selected colour triangle. Please select the Custom option from this menu, as shown below:

A Colour Selector dialog box should now appear. In the RGB settings, please set the Red value to 150, then set both the Green and Blue values to 0. Your screen should match the following:

Click OK to confirm the changes and return to the Vector Fill options.
Now click on the middle colour triangle to select it, click on the button and select Custom from the menu which appears. In the RGB settings, please set the Red value to 255, then set both the Green and Blue values to 0. Click OK to confirm the changes.
Finally, click on the colour triangle at the far-right of the gradient bar to select it, then click on the button and select Custom from the menu which appears. In the RGB settings, please set the Red, Green and Blue values to 255 (solid white). Click OK to confirm the changes.
You should now be able to see two Offset fields. Please set the left field to 50 (this will horizontally centre the circular gradient) and set the right field to 20 (this will position the circular gradient near the top-edge of the object).
The Vector Fill options should now match the following:

Click Apply and OK to confirm the changes and return to the editor. The publication should now look like the following:

If we want to display a shadow under our ball, we need to add a visible floor to the publication upon which the shadow can be displayed. Fortunately, a simple Frame object should be sufficient for this task.
Select the Frame tool  and position the cursor in the bottom-left corner of the page. Now hold down the left-mouse button and drag the cursor to the right until you reach the right-hand edge of the publication. Now drag the cursor upwards and keep an eye on the size of the frame object (which should be displayed on a tooltip in the centre of the object). Set the size to (800, -120) then release the left-mouse button.
The Frame properties should now appear on-screen. Please select the Background tab and enable the Use Background option. Now open the Colour drop-down menu and select Linear Gradient and chose a gradient which runs from a mid grey to a pale grey which makes the foregorund look lighter and helps give the impression of a floor coming towards the viewer. You can also apply a texture as we did before. In the illustration we have chosen sidewalk from the Basic category
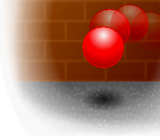
Click Apply and OK to confirm the changes and return to the publication which should now look something like this.

I would now recommend renaming the Frame object to 'Floor' and positioning it beneath the Ball object in the Organiser pane (as we want the ball to bounce in front of the floor, not behind it). To rename, simply right-click on the object in the Organiser pane, select Rename from the menu which appears, then type in the required name and tap Enter to confirm.
The Organiser pane should now match the following:

Now let's add a shadow of the ball onto the floor. To create the shadow, we will use another Frame object. Please first ensure that the Floor object is currently selected and highlighted in the Organiser pane - this will ensure that the Shadow we create becomes a 'child' of the Floor frame, making it easier to align the centres of the objects.
Now select the Frame tool again and create a frame which lies within the boundary of the Floor object. The size of the frame is not important at present.
Once the frame is created, you should be taken into the frame properties. Please select the General tab and set the Width to 60 and the Height to 30:

Now select the Background tab and enable the Use Background option. Set the Style to Solid, the open the Colour drop-down menu and select the solid black colour, indicated below:

Now enable the Transparency option and set its value to 50%:

Select the Effects tab and enable the Blend Alpha effect. From the list of Blend Alpha effects, please select Circle, as shown below:

Click Apply and OK to confirm the changes and return to the editor.
Now please rename the current object to 'Shadow'. The Organiser pane should look like:

We now need to centre the Shadow frame within the Floor frame. To do this, simply ensure that the Shadow frame is selected and click Arrange > Centre Objects > Both. The publication should now resemble the following:

We need to test how the shadow looks when previewed, so let's set the ball to drop straight down at the start of the publication. To do this, we simply need to go back into the Script Object and change the initial value of speedX to zero. The variables at the start of your code should match the following:
floorX1 = 25
floorX2 = 775
floorY1 = 25
floorY2 = 575
speedX = 0
speedY = 0
gravity = 1
bounce = 0.9
Now preview the publication. You should notice that the ball now drops straight down, but drops straight past our shadow to bounce off the bottom edge of the publication. We therefore need to raise the floor of our publication to match the position of our shadow.
The bottom-edge of the 'Floor' frame is currently positioned at the very bottom of the page and this frame has a height of 120 pixels. The 'Shadow' frame is vertically-centred within this frame, so is positioned 60 pixels from the bottom of the publication. We therefore need to raise the floor of the publication by 60 pixels. To do this, simply subtract 60 from the 'floorY2' constant, making the new value 515:
floorX1 = 25
floorX2 = 775
floorY1 = 25
floorY2 = 515
speedX = 0
speedY = 0
gravity = 1
bounce = 0.9
Now preview the publication. The ball should now drop down and bounce at the position of the shadow.
We now need to add code to determine the current position of the ball, move the shadow to the same horizontal position and scale and fade the shadow based on the ball's vertical position. We want the shadow to be updated regardless of whether the ball is currently grabbed or freefalling, so these actions will need to remain outside our if and else statements. We shall therefore add these at the start of the loop, after the while (true) { line.
To determine the ball's current position, simply use the GetPosition() function:
while (true) {
  pos = Ball.GetPosition()
We can now move the Shadow horizontally to match the horizontal position of the ball:
Shadow.SetPositionX(pos.x)
To change the size of the shadow, we are going to use the SetScale() function, which uses 'scale factors' to determine the new size of the object. For example, to halve the height and width of an object, you would need to multiply both dimensions by 0.5. The correct syntax is therefore object.SetScale(0.5, 0.5). To double the height and width, you would use the syntax object.SetScale(2.0, 2.0), as both dimensions need to be multiplied by 2.
The shadow will change in size according to the ball's current vertical height, with the shadow being full-size (scale 1.0) when the ball is on the floor and at its smallest when the ball is at the top of the publication. We can therefore calculate the scale by dividing the ball's current vertical position pos.y by the floor of the publication floorY2. This will give us a scale of 1.0 when the ball is on the floor (as pos.y will equal floorY2, and two identical values divided by each other always equal 1), and a much smaller number when the ball is at the top of the publication (or to be precise, 25/515 = 0.05).
Let's code this:
scale = pos.y/floorY2
Then change the size of the shadow accordingly:
Ball.SetScale(scale,scale)
We now need to change the transparency of the shadow as the ball changes in height, with the shadow being most transparent when the ball is at the top of the publication and most opaque when it is situated on the floor. The function we need to use to change the shadow's transparency is SetTransparency() which requires a parameter in the form of a percentage (with 100 being fully transparent and 0 being fully opaque).
The easiest way to calculate this percentage is to simply multiply our existing scale variable (which ranges from 0.05 to 1.00) by 100 (giving us a percentage range of 5% to 100%).
However, this would mean that when the ball is situated on the floor, its scale would equal 1.00 and its transparency would be set to 100% making it completely invisible. Conversely, when the ball is situated at the top of the publication, its scale would equal 0.05, resulting in a transparency of 5% (almost fully opaque).
We therefore need some way of reversing these values and the quickest solution is simply to subtract these values from 100. This would mean that, when the ball is situated on the floor of the publication:
-> pos.y = 715
-> floorY2 = 715When the ball is situated at the ceiling of the publication:
-> pos.y = 25
-> floorY2 = 715
-> scale = pos.y/floorY2 ...which equals 0.05
-> percentage = scale * 100 ...which equals 5
-> transparency = 100 - percentage ...which equals 95. The shadow will be almost fully transparent
This should do the trick. Let's code!
Ball.SetTransparency = (100 - (scale*100))
The complete Script Object should now read:
floorX1 = 25
floorX2 = 775
floorY1 = 25
floorY2 = 515
speedX = 0
speedY = 0
gravity = 1
bounce = 0.9
while (true) {
  pos = Ball.GetPosition()
  Shadow.SetPositionX(pos.x)
  scale = pos.y/floorY2
  Shadow.SetScale(scale,scale)
  Shadow.SetTransparency(100 - (scale*100))
  if (pressed == 1) {
    pos = Ball.GetPosition()
    mouse = GetMousePosition()
    Ball.SetPosition(mouse.x,mouse.y)
    speedX = mouse.x - pos.x
    speedY = mouse.y - pos.y
  } else {
    speedY = speedY + gravity
    Ball.Move(speedX,speedY)
    pos = Ball.GetPosition()
    if (pos.x < floorX1) {
      Ball.SetPositionX(floorX1)
      speedX = speedX * -bounce
    }
    if (pos.x > floorX2) {
      Ball.SetPositionX(floorX2)
      speedX = speedX * -bounce
    }
    if (pos.y < floorY1) {
      Ball.SetPositionY(floorY1)
      speedY = speedY * -bounce
    }
    if (pos.y > floorY2) {
      Ball.SetPositionY(floorY2)
      speedX = speedX * bounce
      speedY = speedY * -bounce
    }
  }
  wait(0.01)
}
Preview the publication and the shadow should now move, scale and fade according to the position of the ball.
Preventing the ball from being dragged below the shadow
The last remaining problem is that the user is currently able to drag the ball to the very bottom of the page and below the shadow, which is obviously not very realistic. To prevent this, we simply need to check whether the ball has been dragged below 'floorY2'. If so, we need to set the ball back to the position of the floor and stop the ball from being dragged further. Let's add this code to the if (pressed == 1) condition (as this is when the ball is dragged):
if (pressed == 1) {
  pos = Ball.GetPosition()
  mouse = GetMousePosition()
  Ball.SetPosition(mouse.x,mouse.y)
  speedX = mouse.x - pos.x
  speedY = mouse.y - pos.y
  if (pos.y > floorY2) {
    Ball.SetPositionY(floorY2)
    pressed = 0
}
Now preview the publication and try to drag the ball to the bottom of the page. The ball should now release itself from your grasp once it reaches the floor and you will need to grab the ball again to drag it to a different location.
Tidying up the code
There are a number of final steps we can take to streamline and tidy up our Script Object.
For a start, our Script Object currently checks the position of the Ball object on three separate occasions throughout the loop. There is one pos = Ball.GetPosition action at the very beginning of the loop, another in the if (pressed == 1) condition and another in the if (pressed == 0) condition. As the first action monitors the ball's position regardless of whether the ball is grabbed or released, we can actually delete these two other instances. Once deleted, the code should look like the following:
floorX1 = 25
floorX2 = 775
floorY1 = 25
floorY2 = 515
speedX = 0
speedY = 0
gravity = 1
bounce = 0.9
while (true) {
  pos = Ball.GetPosition()
  Shadow.SetPositionX(pos.x)
  scale = pos.y/floorY2
  Shadow.SetScale(scale,scale)
  Shadow.SetTransparency(100 - (scale*100))
  if (pressed == 1) {
    mouse = GetMousePosition()
    Ball.SetPosition(mouse.x,mouse.y)
    speedX = mouse.x - pos.x
    speedY = mouse.y - pos.y
    if (pos.y > floorY2) {
      Ball.SetPositionY(floorY2)
      pressed = 0
    }
  } else {
    speedY = speedY + gravity
    Ball.Move(speedX,speedY)
    if (pos.x < floorX1) {
      Ball.SetPositionX(floorX1)
      speedX = speedX * -bounce
    }
    if (pos.x > floorX2) {
      Ball.SetPositionX(floorX2)
      speedX = speedX * -bounce
    }
    if (pos.y < floorY1) {
      Ball.SetPositionY(floorY1)
      speedY = speedY * -bounce
    }
    if (pos.y > floorY2) {
      Ball.SetPositionY(floorY2)
      speedX = speedX * bounce
      speedY = speedY * -bounce
    }
  }
  wait(0.01)
}
There are also a number of instances where a variable has been set to equal itself plus another variable. For example:
speedY = speedY + gravity
We can shorten this using the following syntax:
speedY += gravity
Similarly, we can shorten:
speedX = speedX * -bounce
to:
speedX *= -bounce
If we shorten all of these commands, the code should look as follows:
floorX1 = 25
floorX2 = 775
floorY1 = 25
floorY2 = 515
speedX = 0
speedY = 0
gravity = 1
bounce = 0.9
while (true) {
  pos = Ball.GetPosition()
  Shadow.SetPositionX(pos.x)
  scale = pos.y/floorY2
  Shadow.SetScale(scale,scale)
  Shadow.SetTransparency(100 - (scale*100))
  if (pressed == 1) {
    mouse = GetMousePosition()
    Ball.SetPosition(mouse.x,mouse.y)
    speedX = mouse.x - pos.x
    speedY = mouse.y - pos.y
    if (pos.y > floorY2) {
      Ball.SetPositionY(floorY2)
      pressed = 0
    }
  } else {
    speedY = speedY + gravity
    Ball.Move(speedX,speedY)
    if (pos.x < floorX1) {
      Ball.SetPositionX(floorX1)
      speedX = speedX * -bounce
    }
    if (pos.x > floorX2) {
      Ball.SetPositionX(floorX2)
      speedX = speedX * -bounce
    }
    if (pos.y < floorY1) {
      Ball.SetPositionY(floorY1)
      speedY = speedY * -bounce
    }
    if (pos.y > floorY2) {
      Ball.SetPositionY(floorY2)
      speedX = speedX * bounce
      speedY = speedY * -bounce
    }
  }
  wait(0.01)
}
That's the end of the Bouncing Ball tutorial! I hope this demonstrates some of the powerful, dynamic possibilities which can be created quite easily in Opus and inspires other games and publications based on these ideas.
tutorial to create a bouncing ball simulation in Opus Pro